
Mortar Joints: Types, Profiles, and Which Ones Shed Rain
Ten mortar joint profiles compared by shape, tooling, and rain resistance, plus how profile differs from mortar type and when to diagnose before repointing.
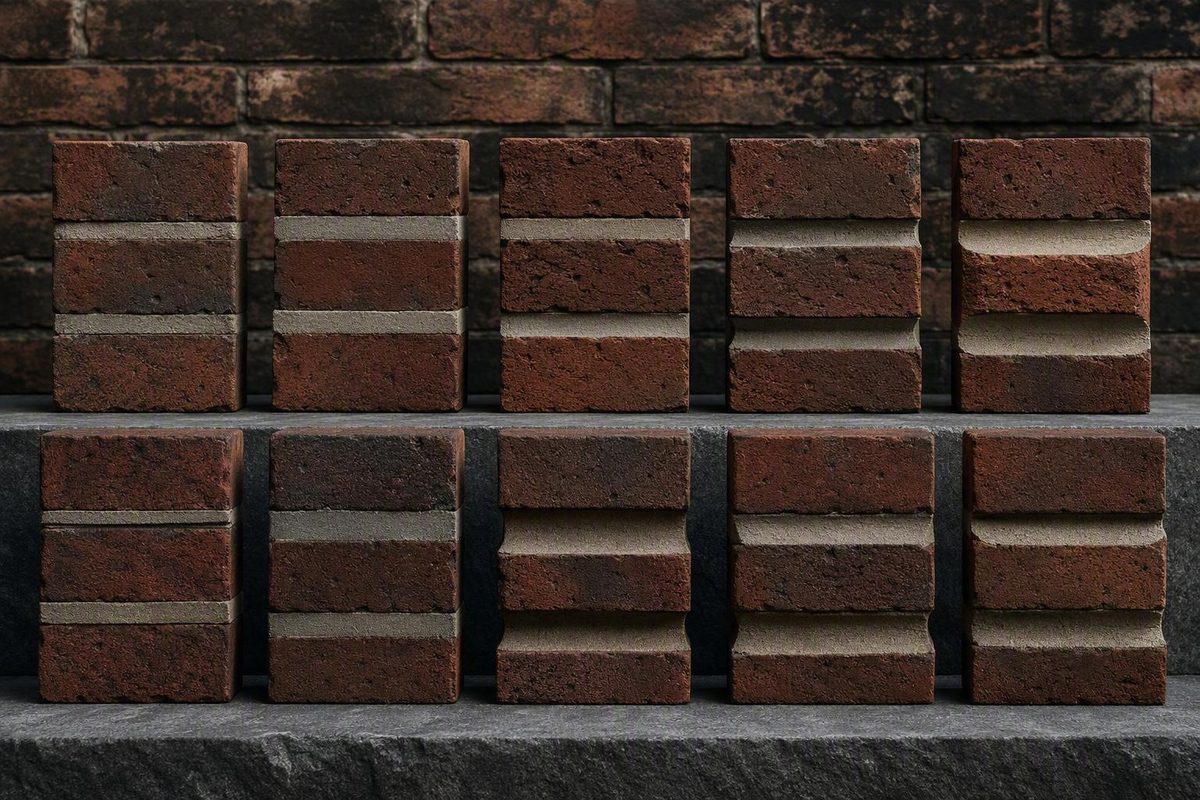
For ordinary rain-exposed brickwork, specify a concave or V joint, completely filled and tooled at the proper stage. Both profiles shed water, and the tooling compresses the mortar against the brick edges, which is where rain actually gets in. Weathered joints are workable outdoors when carefully formed. Struck, raked, flush, extruded, and beaded profiles either hold water on a ledge, leave the face uncompacted, or expose the brick-to-mortar interface, so they belong on sheltered, interior, or concealed work unless the design accepts the trade-off.
The profile is only the visible finish. It is not the mortar type, it is not the wall’s drainage system, and it will not fix a wall that is cracking for another reason. Each of those is covered below, in that order.
Pick your exposure and wall type; the profile table re-ranks below.
Mortar Joint Profile Picker
| Profile | Shape | Rain | Where it fits |
|---|---|---|---|
ConcaveCurved steel jointer compresses the face and presses mortar against the brick edges. Dependable when the joint is fully filled. | Smooth inward curve | Good | Exposed brickwork default |
VV jointer or trowel forms two sloping faces meeting in a groove. Compacted and water-shedding. | Inward V groove | Good | Exposed work wanting a sharper line |
WeatheredInclined face slopes inward from the lower edge and sheds water, but may be less consolidated than concave or V tooling. | Slopes in toward the upper edge | Fair | Outdoors when carefully formed |
StruckOpposite slope to weathered. The recessed lower edge forms a ledge that retains water. | Lower edge recessed | Limited | Sheltered or interior |
RakedMortar removed to a set depth. Performance depends on depth, texture and compaction; a rough recess holds water and exposes the brick-mortar interface. | Flat face set back | Depends | Architectural or historic work where the recess is intended |
FlushCut or wiped level with no groove. Uncompressed, so less rain-resistant than tooled profiles. | Level with the face | Limited | Masonry to be plastered, parged, painted or concealed |
GrapevineGrapevine jointer draws a center groove into a flush or shallow joint. Depends on the underlying joint, groove depth and filling. | Flush with indented center line | Depends | Traditional or antique effects |
ExtrudedSqueezed-out mortar left untooled. Stays exposed to weathering and may break away. | Projects beyond the face | Limited | Interior, sheltered or rustic work |
BeadedBeading tool shapes a raised rounded bead. Raised mortar and exposed ledges are vulnerable surfaces. | Rounded projecting bead | Limited | Sheltered or decorative work |
TuckpointedFine contrasting line applied over a finished background joint. Weather performance rests on the background joint, not the line. | Background plus narrow fine line | Depends | Historic matching and decorative refinement |
Rain ratings are qualitative, from InterNACHI's mortar-joint profile guide and BIA Technical Note 7 (Nov 2017); they are not measured rankings. Complete filling and tooling at the proper stage matter more than the profile name.
Ten Joint Profiles Compared by Shape and Rain Resistance
Joint names describe the profile left after mortar is placed and, usually, tooled. Terminology varies by region and trade, so drawings and specifications should pair the name with a labeled cross-section. The International Masonry Institute’s mortar-joint profile diagram, drawn for anchored brick veneer, is a geometry-based reference of that kind.
| Profile | Cross-section | How it is formed | Visual effect |
|---|---|---|---|
| Concave | Smooth inward curve | Compressed with a curved steel jointer | Dense, rounded recess that softens small irregularities |
| V | Inward V-shaped groove | Tooled with a V jointer or trowel | Crisp, pronounced line |
| Weathered | Slopes inward from the lower edge to the upper edge | Cut or tooled into a straight inclined face | Ordered horizontal shadow line |
| Struck | Opposite slope to weathered; lower edge recessed | Trowel or jointing tool | Strong ledge and shadow at the lower edge |
| Raked | Flat face recessed behind the masonry surface | Mortar removed to a set depth, then left rough or compacted | Emphasizes individual units and exposes their edges |
| Flush | Level with the masonry face | Cut or wiped flush, no groove | Flat, nearly continuous surface |
| Grapevine | Flush or shallowly recessed with an indented center line | Grapevine jointer draws the central groove | Traditional, handmade, or antique effect |
| Extruded | Irregular mortar projects beyond the face | Left where mortar squeezes out, untooled | Rough, rustic texture |
| Beaded | Rounded bead projects beyond the joint | Shaped with a beading tool | Formal raised line with pronounced shadows |
| Tuckpointed | Mortar background with a narrow contrasting or projecting line | Background finished first, fine line applied after | Joints appear narrower and more regular |
| Profile | Rain-resistance considerations | Where it fits |
|---|---|---|
| Concave | Tooling consolidates the surface and the curve sheds water; dependable when fully filled | Exposed brickwork |
| V | Compacted tooling and sloping faces direct water away from the interfaces | Exposed work wanting a sharper line |
| Weathered | Inclined face sheds water but may be less consolidated than concave or V | Outdoors when carefully formed |
| Struck | Recessed lower edge forms a ledge that retains water | Limited for exposed walls |
| Raked | Depends on recess depth, texture, and compaction; rough recesses hold water | Architectural or historic work where the recess is intentional |
| Flush | Uncompressed finish is less rain-resistant than compacted tooling | Masonry to be plastered, painted, parged, or concealed |
| Grapevine | Depends on the underlying joint, groove depth, tooling, and filling | Traditional or antique effects |
| Extruded | Projecting, untooled mortar stays exposed and may break away | Interior, sheltered, rustic, or limited decorative work |
| Beaded | Raised mortar and exposed ledges are vulnerable surfaces | Sheltered or decorative work |
| Tuckpointed | Rests on the soundness and profile of the background joint, not the decorative line | Historic matching and decorative refinement |
These are qualitative comparisons, not measured rankings. InterNACHI’s illustrated guide identifies concave and V joints as comparatively rain-resistant, weathered joints as potentially suitable outside, and struck, beaded, extruded, rough-raked, and flush finishes as having greater limitations in exposed conditions (The Most Common Mortar Joints).
Raked needs a separate word. “Raked” says the mortar face is recessed. It does not say whether that face is rough or compacted, shallow or deep. A compacted rake performs better than a loose, porous one, but the geometry still exposes the brick edges and creates a surface where water sits.
Why Tooling and Complete Filling Matter More Than the Name
Rain rarely passes straight through sound brick or sound mortar. It follows minute separations where mortar meets the unit, or gaps in bed and head joints that were never filled. The profile governs what happens at the exposed face; filling and workmanship govern whether a connected path exists deeper in the wall.
Picture two bed joints in section, exterior on the left. In the first, a compacted concave joint, the mortar fills the full bed, the tooled face curves inward, and runoff continues down the exterior face of the brick below. In the second, a recessed joint with a concealed defect, the recess leaves a horizontal ledge that holds water, the upper interface between brick and mortar is exposed, and a void inside the joint connects that wetted ledge to the back of the wythe. Water has three routes in the second joint: along the separation at the interface, through the incompletely filled joint, and from the water sitting on the ledge.
Four principles follow. Curved or sloping faces encourage runoff instead of presenting a shelf. Tooling at the proper stage consolidates the exposed mortar and presses it against the masonry edges. Rough recesses and ledges hold droplets and prolong wetting. Complete filling removes the concealed gaps that no surface tooling can reach.
A concave joint is made by drawing a curved steel jointer along the mortar, which produces both the inward curve and a smooth, compressed surface. A V joint uses a V-shaped jointer or the trowel to form two sloping faces meeting in a central groove. In both cases the rain resistance comes from geometry plus consolidation, not from the name.
That same distinction explains the spread among the weaker profiles. Raking out mortar can leave a coarse, porous face and exposed interfaces; compacting the recess improves it but does not remove it. An extruded joint stays projecting and largely untooled. A beaded joint deliberately exposes a raised ridge. A struck joint puts the recess at the lower edge and forms a ledge.
Complete filling is the non-negotiable. Tooling cannot close a hidden gap in a head joint or replace mortar missing from the back of a bed joint. Brick Industry Association guidance describes how gaps and minute brick-to-mortar separations carry water inward, and how drainage walls manage that incidental penetration through cavities, flashing, and weeps (Technical Note 7, Water Penetration Resistance—Design and Detailing, November 2017).
Cleaning can undo careful joint work. Aggressive pressure washing or acid around recessed joints erodes mortar, exposes interfaces, and opens new voids. Choose the method for the particular brick, mortar, profile, age, and condition rather than treating it as a generic final wash.
The Joint Is Only the First Line of the Wall’s Water Strategy
No profile makes a masonry wall waterproof. A well-formed joint reduces the water that gets in; the wall construction determines what happens to the water that does.
A barrier wall, including some single-wythe construction, depends on masonry thickness and completely filled joints. With no drainage cavity behind the face, a workmanship defect is a fairly direct route inward. A concave or V profile does not make a poorly filled single-wythe wall fit for severe wind-driven rain.
A drainage wall assumes some moisture passes the exterior wythe and gives it a way back out: an exterior masonry wythe, a drainage cavity, a water-resistive barrier where the backing calls for it, through-wall flashing at interruptions and terminations, and weeps. The Brick Industry Association describes drainage walls as this combination of cavity, flashing, barrier, and weeps, and notes that performance still depends on design, construction, materials, and maintenance (Technical Note 7, “Wall System Selection” and “Water-Resistive Barrier”). Sound joints reduce the load on that system; they do not replace it.
When chasing a leak, inspect the joints alongside flashing, weeps, the drainage space, openings, copings, penetrations, transitions, roof-to-wall connections, and the terminations of adjacent materials.
Joint Profile Is Not Mortar Type
A joint profile is the finished geometry of the visible surface. Mortar type is a classification of mortar properties and intended applications. Choosing a concave joint does not choose Type N, and specifying Type S says nothing about whether the finish is concave, V, raked, or flush.
| Mortar type | General character | Common application context |
|---|---|---|
| Type N | General-purpose; good workability and bond | Ordinary above-grade brickwork and much anchored veneer |
| Type S | Higher compressive and flexural bond strength | Greater structural demand or where the specification requires it |
| Type M | High compressive strength, comparatively poor workability | Certain high-load or below-grade applications |
| Type O | Low strength | Mainly interior work and some restoration |
These are tendencies, not specifications. The Brick Industry Association recommends the lowest-compressive-strength mortar that meets the project requirements and is explicit that stronger is not better. Exposure, structural demand, unit properties, bond, workability, durability, workmanship, and code provisions all bear on the choice (Technical Note 8B, Mortars for Brickwork—Selection and Quality Assurance, March 2020).
An ordinary exterior anchored brick veneer might pair Type N with a compacted concave joint: the concave finish handles exposed geometry and tooling, the Type N designation handles mortar selection. Structural loading, seismic design, severe exposure, or high-absorption units could push the mortar specification elsewhere while the concave profile stays. Rules of thumb like “exterior means Type S” or “old brick means Type O” skip that analysis, and a mortar stronger or denser than the units it binds is a liability, not a margin.
Diagnose Before You Repoint
Joints that look shot may need repointing, but the first job is working out why they failed. New mortar over an active cause is money spent twice.
Look for powdering, disintegrating, missing, or deeply eroded mortar; cracks along joints or through units; loose, displaced, or rocking units; recurring damp patches or damaged interior finishes; spalled faces; corrosion staining or displacement near embedded metal; vertical bulges (bowing); horizontal bulges (sweeping); and leaning walls, piers, parapets, or chimneys.
Cracks come from settlement, drying shrinkage, thermal or moisture movement, inadequate support, freeze-thaw, corrosion, salt expansion, incompatible materials, or displacement. Work in this order:
- Record the symptom: location, direction, extent, staining, and whether units as well as joints are affected.
- Look for movement and moisture sources: supports, openings, adjacent materials, roof drainage, wall caps, flashing, grade, penetrations, embedded metal.
- Establish whether the condition is active. Monitoring shows whether a crack moves seasonally or keeps widening.
- Correct structural or drainage defects first. Failed support, corrosion, displacement, or recurring water entry will not be cured by pointing.
- Choose the repair after diagnosis. Inactive cracks and locally deteriorated joints are candidates for pointing; active movement calls for movement accommodation or structural investigation.
A photograph or a familiar crack pattern does not settle whether movement is harmless, inactive, or structural. Get a professional in when masonry is displaced, bowed, sweeping, leaning, severely spalled, loose, persistently damp, or actively cracking, when supports look to be failing, or when the historic materials are uncertain. National Park Service guidance recommends the same sequence: monitor cracking, spalling, mortar deterioration, bowing, sweeping, and leaning, then investigate the cause before repair (Common Problems with Brick Masonry, updated June 29, 2018).
How much to repoint depends on the cause and distribution of the deterioration, the compatibility of the proposed repair, and the condition of the surrounding mortar.
Historic Joints Need Compatible Mortar and Matching Tooling
In traditional masonry the joints are the sacrificial part of the wall. They take up limited movement and let moisture migrate out, so weathering happens in replaceable mortar instead of the brick or stone.
Replacement mortar should be no harder or less vapor-permeable than the historic mortar and, where appropriate, softer and more permeable than the units. Mortar that is too strong transfers stress into softer units. Mortar that is too dense traps moisture and salts in the units, which then crack or spall. National Park Service guidance says to correct drainage failures, settlement, dampness, and the other underlying causes before installing physically and visually compatible replacement mortar (Preservation Brief 2: Repointing Mortar Joints in Historic Masonry Buildings).
Hardness alone does not prove compatibility. An aged lime mortar can feel hard and still be relatively permeable; compressive strength says nothing about vapor movement, bond, or response to thermal and moisture cycling.
Matching the look is the other half. Historic repointing should match mortar color and tone; aggregate color, particle shape, and grading; surface texture; joint width; depth and shape of the profile; tooling marks and degree of compaction; and how the joint meets the masonry edges.
Sand deserves the most attention. It is the largest component by volume and drives color, texture, workability, cohesiveness, and durability. Picking mortar off a color chart without looking at the aggregate produces a repair that differs visibly and physically from the original.
Build a sample panel. It lets owner, designer, and mason judge cured, not wet, color, sand texture, joint width, profile, tooling, edge treatment, and workmanship before the repair spreads across an elevation. Laboratory analysis is worth it when the original composition is uncertain, the masonry is especially significant, or close duplication matters.
Do not reduce this to “every old wall needs pure lime” or “portland cement is banned.” Some historic masonry was built with cement-containing mortar, so the right replacement depends on the actual materials. Significant fabric, soft or deteriorated units, unusual finishes, widespread failure, or unknown mortar composition warrants a preservation architect, conservator, or mason experienced with historic work.
Repointing, Tuckpointing, and German Smear Are Different Jobs
Repointing removes deteriorated mortar from the joints and replaces it with new, compatible mortar. The aim is to restore joint integrity while preserving the masonry edges and addressing the cause of deterioration.
Tuckpointing, in its technical historic sense, is decorative. A mortar background is installed or finished, then a narrow contrasting or projecting line, often lighter, is applied to give the appearance of fine, regular joints. Its weather performance rests on the background joint, not the decorative line.
German Smear, also called overmortar, is an appearance treatment: a thin mortar coat extends past the joints onto parts of the brick faces. Glen-Gery’s illustrated guide lists overmortar separately from concave, V, raked, flush, grapevine, and extruded treatments (Mortar Joints, “Overmortar Joint”).
On historic work, keep and match the established profile unless research and the preservation approach support a change. Joint width, shape, texture, and tooling are part of the architectural character; swapping them for a fashionable recess or smear changes both the look and the weathering behavior.
The selection rule, in order: identify the wall system and exposure; choose a profile that sheds water and can be thoroughly compacted; specify the mortar separately for compatibility and structural need; correct drainage or movement defects before touching the joints. Concave and V are the starting point for ordinary exposed brick, not the universal answer, and historic, displaced, damp, spalled, or actively cracking masonry gets assessed before repointing begins.